
Sync via local NAS server
- Stefan
- 6 days ago
- 3 min read
You can synchronize the collections from smasi.app via your own local NAS server using the WebDAV interface, regardless of the platform.
Prerequisites
Set up on Synology
1) Install WebDAV Server
First, you need to install the WebDAV service on your NAS server. To do this, log in as an administrator on the console of your local NAS server. Start the 'Package Center' and search for 'WebDAV Server' in the 'All Packages' section.

Now click on the 'Install' button for the 'WebDAV Server' package. You can then complete the installation of this additional package by clicking on 'Finish'.
2) Enable HTTP in the WebDAV server
Now open the WebDAV server in the Package Center and enable the HTTP protocol:

Note: The current version of smasi.app does not yet support encrypted connections via HTTPS.
After that, you can close this window and the Package Center.
3) Create new user
We recommend creating a separate user on Synology for synchronization. To do this, open the Synology 'Control Panel' and go to the 'Users and Groups' section. Click on 'Create' button:

4) Setting up the user
In the following dialog box, you can enter a user name such as 'smasi-user' and set a secure password. Please make a note of the user name and password you have set, as you will need to enter this information later in smasi.app.

On the following page, you can leave the default group 'users' selected and continue. You also do not need to make any assignments on the page with permissions for shared folders, as we will create the folder later. You can also skip the user quota.
5) Assign permission for WebDAV Server
On the following user page, you must now activate the permission for the WebDAV server:

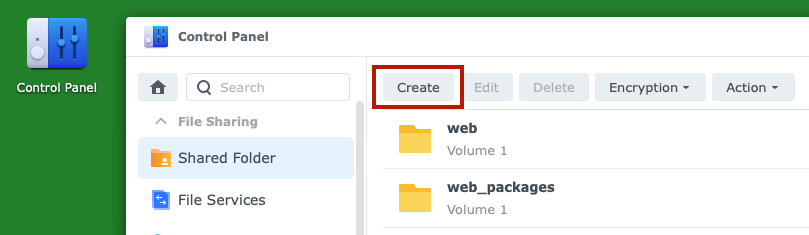
6) Create new shared folder
Next, go to the 'Shared Folders' section in the Control Panel. Click on the 'Create' button here:
7) Create a folder named 'smasi'
In the following dialog box, enter the name 'smasi' for the new folder. We also recommend disabling the 'Recycle Bin' option:

On the following page, you can set up encryption if required. For performance reasons, we recommend only using this for sensitive content. At the end, you can confirm your settings.
8) Assign the user to the folder
Finally, you can assign the created user 'smasi-user' with 'Read/Write' permissions for this folder:

Done! Your WebDAV server is now fully configured on your NAS server.
9) Set up sync service in smasi app
Now you can switch to smasi.app and click on the 'Set up syn' command in the menu at the top right of the 'Collections' page.
In the dialog box that appears, click on the plus symbol at the top right to add a new sync service.
10) Configure sync service
Select 'NAS server (WebDAV)' as the system and fill in the fields accordingly.

Label:
You can leave this field blank unless you want to use multiple WebDAV services.
Web Address:
Here you must enter the IP address with port number. An explanation of the format can be found below.
User and Password:
Now you can enter the username you created earlier and the password you wrote down.
You can check the connection to your NAS server using the 'Test' button.
If the connection is not successful, first check that the format of the web address is correct:

You can find the appropriate IP address via the Synology status widget. If necessary, you can also use the server name instead of the IP number.
Add the port number separated by a colon to the IP address. You can find the port number via the 'WebDAV Server' in the Package Center (see section 2).
11) Synchronize collections
Now you are ready to synchronize your first collections.


